Best Paint for Treated Wood
Pressure-treated wood is one of the most durable exterior building materials available, but it is also one of the most unforgiving surfaces to paint. The same preservative chemicals that protect lumber from rot, insects, and moisture also create conditions that cause paint to peel, blister, or fail entirely if you choose the wrong product or skip critical preparation steps. This guide covers everything you need to select the right paint, understand the chemistry behind the recommendation, time your project correctly, and apply paint in a way that holds up for years rather than seasons.
Does treated wood need a primer before painting? Yes, a water-based exterior primer is recommended before painting pressure-treated wood. The alkaline nature of fresh preservative treatments and the residual moisture retained in treated lumber both undermine adhesion when paint is applied directly to bare wood. Primer seals the surface, neutralizes alkalinity, and gives the topcoat a stable base that prevents early failure.
If you are still weighing whether to take this project on yourself or hand it to a professional, exterior wood painting handled by Ace Hardware Painting Services covers the full scope: surface assessment, primer selection, application, and cleanup. Either way, the information below gives you the foundation to make a confident decision at every stage.
Quick Overview of the Treated Wood Painting Process
- Confirm wood has cured long enough to accept paint (typically 3 to 6 months for ACQ-treated lumber in temperate climates)
- Perform the water-droplet absorption test to verify the surface is ready
- Clean the surface with a mild detergent solution and let it dry fully (48 to 72 hours minimum)
- Sand rough grain lightly if needed; inspect for rot or splits before proceeding
- Apply one to two coats of a water-based exterior primer, allowing full dry time between coats
- Apply two coats of a water-based acrylic exterior paint formulated for treated or rough-sawn wood
- Allow full cure before heavy foot traffic or moisture exposure
- Plan for re-inspection and potential recoating every 5 to 7 years depending on climate and UV exposure
Assessing Treated Wood Before You Begin
Understanding Preservative Types
Not all pressure-treated wood is the same, and the preservative chemistry matters when you are selecting paint and planning your timeline. The most common preservative family in residential lumber sold today is ACQ (alkaline copper quaternary) or CA (copper azole). Both are copper-based systems that replaced the older CCA (chromated copper arsenate) formulation, which is no longer used for most residential applications. Copper-based preservatives create a highly alkaline wood surface, which is the primary reason a standard exterior primer can fail if it lacks the right binder chemistry. Older CCA-treated wood, found in decks and structures built before 2004, tends to have a more weathered, stabilized surface that behaves more predictably under paint than freshly treated ACQ or CA lumber.
Knowing which type you have helps you choose between a standard water-based exterior primer and an alkali-blocking formulation. Freshly treated ACQ or CA lumber almost always benefits from an alkali-blocking primer. Weathered CCA-treated wood in structurally sound condition can typically accept a high-quality standard water-based exterior primer after thorough cleaning.
Pre-Work Checks and Measurements
Before buying a single can of primer, run through these checks. First, perform the water-droplet test: sprinkle a small amount of water on the wood surface. If it beads up, the wood is still off-gassing preservative and is not ready to paint. If it absorbs within a few minutes, the surface can accept paint. Second, look for checking, splitting, or rot at cut ends and along the board face. Address structural damage before painting; paint will not seal rotted wood. Third, check moisture content if you have access to a pin-type moisture meter. Most paint manufacturers recommend below 15 to 19 percent moisture content before application. Finally, measure total surface area so you can calculate primer and paint coverage accurately and avoid mid-project shortages.
Essential Equipment and Materials for Painting Treated Wood
Brush Versus Sprayer: The Primary Equipment Decision
Is it better to spray or brush paint on treated wood? Brushing allows better primer saturation into the rough grain of treated lumber and gives you more control on vertical surfaces like fence panels and railing posts. A high-quality synthetic bristle brush forces primer and paint into surface texture rather than sitting on top of it, which is the difference between a coating that holds for five years and one that starts lifting at two. Spraying offers faster coverage on large flat decks and smooth board runs, but porous treated wood requires more primer coats when sprayed because the atomized product does not penetrate grain the same way a loaded brush does. For most residential projects involving fences, posts, trim, and furniture-scale pieces, a 3-inch to 4-inch synthetic bristle brush is the practical default. Spraying is worth considering on wide, low-profile deck surfaces if you have proper technique, a low-wind day, and adequate masking in place.
Paint and Primer Selection
Water-based acrylic exterior paint is the required product category for pressure-treated wood. The reasons are chemical, not merely conventional. Treated wood retains residual moisture that must escape through the paint film over time; water-based acrylic formulations allow that vapor transmission while oil-based paints do not. Oil-based paints form a less permeable film that traps moisture beneath the coating, accelerating adhesion failure and in some cases contributing to accelerated decay at the wood surface. Expect quality water-based acrylic exterior paint to carry an acrylic-resin content percentage on the technical data sheet, a mildew-resistance rating, and an exterior-exposure classification. Benjamin Moore exterior acrylic paints are formulated specifically for performance on rough and treated exterior wood surfaces, with the flexibility and vapor permeability the substrate demands. When selecting a finish, satin finishes offer the best combination of moisture resistance and ease of cleaning on horizontal surfaces like decks; flat or low-sheen finishes are better on vertical fence panels and siding where glare is a concern.
Other Materials You Will Need
- Water-based exterior primer (alkali-blocking formulation for freshly treated ACQ or CA lumber)
- Mild detergent and stiff-bristle scrub brush or pressure washer for surface cleaning
- 80-grit to 120-grit sandpaper or sanding block for light surface smoothing
- Drop cloths or plastic sheeting for masking adjacent surfaces
- Painter's tape for clean edges at transitions
- Stir sticks and a quality paint pail for decanting
- Safety glasses, gloves, and an N95 or P100 respirator when sanding treated wood
- Solvent-free soap and water for brush cleanup (water-based products clean easily)
If sorting through primer chemistry and product data sheets is the point where your project starts to feel uncertain, your local Ace Hardware Painting Services office can assess the surface, confirm the right primer for your specific wood, and get the job scoped before anything is purchased.
Step-by-Step Treated Wood Painting Process
Step 1: Verify the Wood Has Cured
Adequate curing time is the single most common step homeowners skip, and it is the most common reason paint fails on treated wood. How long should you wait after treatment before painting pressure-treated wood? For typical ACQ-treated or CA-treated lumber sold today, the standard waiting period is 3 to 6 months in temperate climates with moderate humidity. In high-humidity regions or during periods of prolonged wet weather, curing takes longer because moisture dissipates more slowly. In hot, dry climates, curing can happen at the shorter end of the range. Freshly treated lumber often arrives at job sites still visibly wet, sometimes discolored green or brown from the preservative solution. Do not paint this wood. If you paint before the preservative has stabilized, sap and preservative bleed-through will push through the primer film and cause peeling within 12 to 18 months. Use the water-droplet absorption test described in the assessment section as your go or no-go signal, regardless of what the calendar says.
Step 2: Clean the Surface Thoroughly
Surface contamination is the second most common cause of adhesion failure on treated wood. Even cured lumber accumulates dust, mildew spores, pollen, and UV-degraded wood fiber at the surface. Mix a mild detergent with water and scrub the entire surface with a stiff bristle brush, working with the grain. A pressure washer at low to moderate pressure can speed the process on large flat areas like decks, but avoid direct high-pressure impact on aged or checking wood that may splinter. Rinse thoroughly and allow the wood to dry for a minimum of 48 to 72 hours before applying primer. Do not rush this drying window. Paint or primer applied to a damp surface will not bond correctly, regardless of product quality.
Step 3: Sand and Inspect
Light sanding with 80-grit to 120-grit sandpaper smooths raised grain and removes weathered fiber that would otherwise absorb primer unevenly. You are not trying to strip the surface or remove the preservative treatment; you are simply creating a consistent surface texture that allows primer to grip. After sanding, wipe away dust with a dry cloth or tack cloth. Take this opportunity to inspect for soft spots, splits, or rot at cut ends and knots. Treat any soft spots with a penetrating wood hardener before priming, and replace boards that show structural rot rather than painting over them. Painting over compromised wood does not fix it and accelerates hidden decay.
Step 4: Apply Primer
What happens if you paint pressure-treated wood without primer? Paint may peel, blister, or fail to adhere because the alkaline nature of the preservative-treated surface and residual moisture undermine the topcoat's bond. Primer is not optional on treated wood. Apply one coat of a water-based exterior primer using a synthetic bristle brush, working it into the grain rather than skating across the surface. On freshly treated ACQ or CA lumber, use an alkali-blocking primer to neutralize the elevated surface pH before your topcoat goes on. Allow the primer coat to dry fully according to the manufacturer's specified dry time (typically 2 to 4 hours between coats, 24 hours before topcoat). On highly porous treated wood, a second primer coat improves film build and topcoat adhesion.
Step 5: Apply Paint in Two Coats
Apply your first coat of water-based acrylic exterior paint with a loaded synthetic brush, working in the direction of the wood grain. Maintain a wet edge to avoid lap marks. Allow the first coat to dry to the manufacturer's specified recoat window (typically 2 to 4 hours for water-based products in normal conditions, longer in high humidity or low temperatures). Apply a second full coat. Two coats are not optional on treated wood; a single coat does not achieve the film thickness needed for durability on porous lumber. On horizontal surfaces like decks, pay special attention to end grain at board ends, which absorbs more paint and is the most common point of early moisture intrusion and failure.
Choosing the Right Paint for Treated Wood Surfaces
Application, Cure Window, and Long-Term Aftercare
Why is water-based acrylic paint required for pressure-treated wood? Water-based acrylic paints allow vapor transmission through the paint film, which is essential because pressure-treated wood retains residual moisture that must escape as the wood continues to dry and expand seasonally. Oil-based paints form a less permeable film that traps moisture beneath the coating, leading to blistering, adhesion failure, and in some conditions accelerated surface decay within 12 to 24 months. Water-based acrylics are also chemically compatible with copper-based preservatives like ACQ and CA, where oil-based binders can react with alkaline wood surfaces and break down prematurely.
For product selection, look for a water-based acrylic exterior paint with an explicitly stated acrylic-resin content, a mildew-resistance rating, and UV protection language in the product description or technical data sheet. Benjamin Moore exterior acrylic formulations are built for the flexibility demands of outdoor wood, where seasonal temperature swings cause significant expansion and contraction in the substrate. A paint that cannot flex with the wood will crack and allow moisture infiltration.
Expected durability on well-prepared treated wood runs 5 to 7 years in moderate climates. High-UV environments (southern exposures, higher altitudes) and high-humidity coastal zones compress that range to 3 to 5 years. Inspect the surface annually for chalking, color fade, or early adhesion loss at board ends and edges. Chalking indicates UV degradation of the paint binder and is a normal precursor to recoating at the end of the paint's service life. Color fade alone is not a structural failure, but significant fade combined with any adhesion loss is a signal to schedule recoating before moisture infiltration begins.
Special Considerations for Challenging Treated Wood Projects
Horizontal surfaces like deck boards take the most punishment from UV, moisture, standing water, and foot traffic. On these surfaces, a penetrating deck stain is sometimes a more practical long-term choice than a film-forming paint, because stains do not peel when the wood moves. However, if you are painting, use a satin or semi-gloss finish rated for deck applications, and apply to fully dried, clean boards only. Pay additional attention to end grain, fastener penetrations, and areas around post bases where water collects.
Older CCA-treated wood from structures built before 2004 presents a different set of safety considerations. Arsenic-based preservatives are present in the wood fiber and can become airborne when you sand or grind the surface. Wear a P100 respirator (not just an N95) when sanding CCA-treated lumber, use gloves and eye protection, and dispose of sanding dust according to local waste guidelines rather than in standard household trash. Do not burn CCA-treated wood scraps.
Kiln-dried after treatment (KDAT) lumber is a specialty product that has had most of its residual moisture removed before sale. It accepts paint sooner than standard treated lumber, but primer is still required, and you should still verify with the water-droplet test before proceeding. KDAT boards can still have surface alkalinity from the preservative treatment even when moisture content is within acceptable range.
When the surface complexity, age of the wood, or scope of the project makes material decisions genuinely uncertain, the exterior wood painting assessment process includes surface evaluation before any product is selected or applied. Getting the substrate right before committing to materials protects your investment in paint and labor.
 Maintenance and Long-Term Care
Paint on treated wood does not require frequent intervention once properly applied, but a maintenance plan prevents small issues from becoming full repaints.
- Inspect painted treated wood surfaces annually, ideally in early spring after freeze-thaw cycles
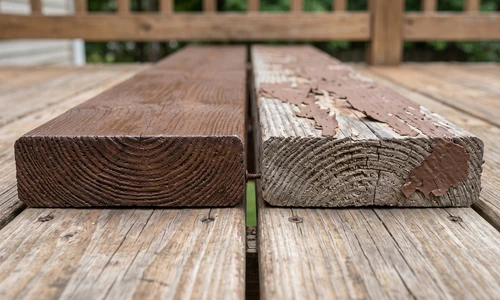
- Look for chalking (white powdery residue) at the surface, which signals UV binder degradation approaching the end of the paint's service window
- Check board ends, post bases, and fastener penetrations for adhesion loss or early lifting, which are the first entry points for moisture
- Clean painted surfaces with a mild detergent and water annually; avoid pressure washing at high intensity, which can lift paint at edges
- Address any mildew spots promptly with a diluted bleach solution or a commercial mildew remover before they spread under the paint film
- If adhesion loss is caught early and isolated to small areas, spot-scraping, spot-priming, and repainting can extend the full surface by several additional years without a complete repaint
- Plan a full recoat cycle at the 5-to-7-year mark in moderate climates; earlier in high-UV or high-humidity environments
Things to Consider Before You Start
Honest self-assessment before buying materials saves significant time, money, and frustration on a treated wood painting project.
- Is the wood actually cured? If you purchased treated lumber within the last few months and the water-droplet test shows beading, the project is not ready. No amount of primer compensates for wood that is still off-gassing preservative.
- Do you know which preservative system is in the wood? ACQ and CA lumber common today behaves differently from older CCA-treated wood. If you are not sure, contact the lumber supplier or check the tag stapled to the board at time of purchase.
- Is the existing structure sound? Paint will not save a rotted post or a split deck board. Address structural issues before the surface preparation phase, not after primer is already on.
- Do you have the right protective gear for sanding? Treated wood dust should not be inhaled. A proper respirator, gloves, and eye protection are not optional steps, particularly on older wood that may contain CCA preservative.
- Is your timeline realistic? Between curing verification, cleaning, drying, two primer coats, and two paint coats with appropriate wait times between each, a treated wood painting project typically spans several days to a week of working time spread across a weekend or two.
- Have you had paint fail on this surface before? If a previous coat peeled within two years, identify the cause before repainting. Painting over a surface without correcting the preparation failure will produce the same result.
If your honest answers to those questions introduce more uncertainty than confidence, that is useful information about which side of the DIY line this particular project falls on.
Why Homeowners Bring in Ace Hardware Painting Services
Some treated wood projects are genuinely straightforward. Others involve surface assessments, preservative chemistry, and material decisions that benefit from professional handling from the start. Here is what Ace Hardware Painting Services brings to those projects:
- Premium Benjamin Moore exterior paints and stains, formulated for the vapor transmission and flexibility demands of pressure-treated wood, are standard in every project scope.
- Color consultation and color samples are included, so you are not committing to a finish on rough treated lumber without seeing how it actually reads on your specific surface.
- A strong workmanship guarantee backs every project, which matters when you are investing in a surface exposed to the full range of outdoor conditions year-round.
- No sprayer, pressure washer, or specialty primer equipment to rent, learn, transport, or return. Crews arrive with everything the project requires.
- Background-checked professional crews handle surface assessment, preparation, priming, and application in a structured sequence so no step gets skipped in the interest of finishing faster.
- A predictable weekday timeline means your deck, fence, or wood structure is not tied up through multiple weekends of staggered drying and recoating.
- Cleanup is included. No leftover primer cans, no paint-loaded brushes, no drop cloths to roll up and dispose of.
- The Ace Hardware name stands behind every project, extending the same quality standard homeowners trust in the store to the work done on their property.
When you are ready to move from planning to action, your local Ace Hardware Painting Services office can schedule an assessment and get your project scoped. Get an Estimate today and have a professional evaluate your treated wood surface before a single product is purchased.
Frequently Asked Questions
How long should you wait before painting freshly treated wood?
For most ACQ-treated or CA-treated lumber, the standard waiting period is 3 to 6 months in temperate climates. High-humidity regions require longer curing times because moisture dissipates more slowly. The most reliable test is the water-droplet absorption test: if water beads on the surface rather than absorbing within a few minutes, the wood is not ready to paint, regardless of how long it has been sitting.
Can you use oil-based paint on pressure-treated wood?
Oil-based paint is not recommended for pressure-treated wood. Oil-based formulations create a less permeable film that traps residual moisture in the wood rather than allowing vapor transmission. Trapped moisture causes the paint to blister and peel within 12 to 24 months and can contribute to surface decay beneath the coating. Water-based acrylic exterior paints are engineered to allow the wood to breathe while providing durable, flexible protection against outdoor exposure.
What primer should you use on pressure-treated wood?
For freshly treated ACQ or CA lumber, an alkali-blocking water-based exterior primer is the right choice. The elevated surface pH of new copper-based treatments can break down standard primer binders, causing adhesion failure before the topcoat is even applied. On older, weathered treated wood that has been cleaned and allowed to dry thoroughly, a high-quality standard water-based exterior primer is typically sufficient. Always check the primer's technical data sheet for treated-wood compatibility language.
Why does paint peel off pressure-treated wood, and how do you prevent it?
Peeling on treated wood usually traces back to one or more skipped steps: painting before the wood has cured, applying paint directly without primer, painting onto a damp or dirty surface, or using oil-based paint that cannot accommodate vapor transmission. Preventing peeling means completing every preparation step in sequence and selecting water-based acrylic products specifically suited to exterior treated wood. If paint is already peeling, scrape the failed area, clean and dry the surface, apply alkali-blocking primer, and repaint with a water-based exterior acrylic.
How many coats of paint does pressure-treated wood need?
Pressure-treated wood requires one to two coats of primer followed by two coats of topcoat. A single topcoat does not achieve sufficient film thickness on porous treated lumber and will wear through faster, particularly on horizontal surfaces exposed to foot traffic and standing water. Two primer coats are worth applying on freshly treated lumber with high porosity or elevated alkalinity. Do not reduce coats to save time; film build is directly tied to how long the finished surface holds up before recoating is needed.
What is the expected lifespan of paint on pressure-treated wood?
Quality water-based acrylic exterior paint applied over proper primer on well-prepared treated wood typically lasts 5 to 7 years in moderate climates. In high-UV environments or coastal regions with sustained humidity, expect a 3-to-5-year service window before recoating is needed. Annual inspection for chalking, color fade, and adhesion loss at board ends and fastener areas helps you catch the early signs of paint aging before moisture infiltration begins and larger-scale preparation work becomes necessary.