
What Siding Repairs Should Be Done Before Painting?
Knowing what siding repairs should be done before painting is the single biggest factor in how long your new paint job actually lasts. Homeowners in Lakewood, CO who skip or rush the repair phase often find themselves looking at peeling, bubbling, or cracking paint within a season or two. That is a frustrating outcome after all the effort and expense of repainting. The good news is that most of these problems are completely preventable. Rot, loose fasteners, open gaps, biological growth, and failing caulk all create pathways for moisture to sneak behind the paint film. Address those issues first, and your primer and topcoat will have a clean, stable surface to hold onto for years.
Essential Siding Inspection Before Repairs
Before you pick up a single tool, do a thorough walk-around of your home. This step alone will save you from priming over a problem you did not know was there. Work in daylight and go around the full perimeter, moving from the roofline down to the foundation. Bring a flathead screwdriver and press it gently into any area that looks discolored, puckered, or soft. Solid wood pushes back. Rotted wood gives way with almost no effort.
As you go, jot down every issue you find by type. A simple checklist keeps you from circling back to areas you already cleaned or primed, and it helps you tackle repairs in the right order later.
- Probe siding boards along the bottom edge and around every window and door frame for soft spots.
- Check each visible nail and fastener for rust staining, popped heads, or loose attachment.
- Look for gaps between siding boards, especially at horizontal lap joints and vertical butt seams.
- Scan for peeling paint, which often points to moisture getting in behind the surface.
- Inspect caulk lines around windows, doors, and trim for cracking, shrinkage, or missing sections.
- Note any green or black staining that signals mildew or algae growth.
Wood Siding Repairs for Paint Preparation
Wood siding takes the most work during siding prep for painting, and for good reason. Wood expands and contracts with humidity and temperature, which puts real stress on the surface over time. Getting these repairs done before any cleaning or priming keeps your work sequence logical and prevents you from having to redo anything.
Addressing Wood Rot with Epoxy Fillers
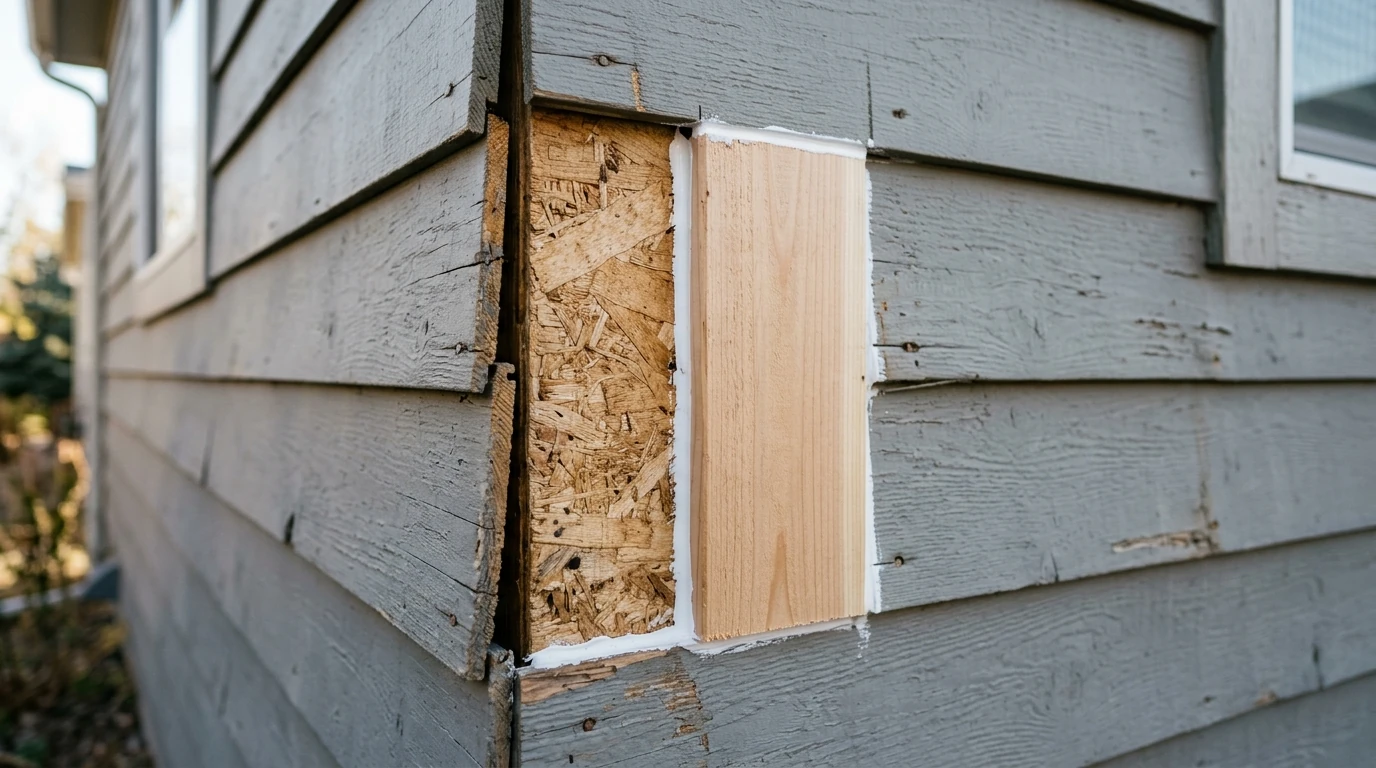
If rot has not gone deeper than roughly half the board's thickness, you do not necessarily need to replace the whole board. Start by cutting away all the soft, visibly rotted material with a chisel or oscillating tool until you hit firm, dry wood underneath. Apply a two-part epoxy consolidant to the exposed area and let it soak in fully. Then mix your epoxy wood filler and pack it in, keeping each layer no thicker than about three-quarters of an inch to avoid shrinkage cracks as it cures.
Once it hardens, epoxy filler sands and primes just like solid wood. It will not rot, shrink, or swell after the fact, which makes it a reliable base for paint. If the rot has gone through more than half the board depth or covers a large stretch, though, replacing the board entirely is the right call. Patching structurally compromised wood with filler alone leads to recurring problems down the road.
Fastener and Nail Hole Repair
Nail and fastener repairs are easy to overlook, but they matter more than most people realize when it comes to siding repair before paint. A popped nail head creates a raised ridge that keeps the paint film from lying flat. Rust bleeding from a corroded fastener will bleed right through your new topcoat unless you address it with a stain-blocking primer first.
For each problem fastener, use a nail set to sink it about an eighth of an inch below the wood face. If a fastener will not hold, pull it out, fill the hole with exterior-grade wood filler or epoxy, and drive a longer ring-shank or stainless fastener into fresh wood nearby. Once all fasteners are seated properly, fill every countersunk hole with paintable exterior filler and sand flush after it cures. Hit any rust-stained spots with a stain-blocking spot primer before you apply your full primer coat.
Vinyl and Aluminum Siding Repair Techniques
Vinyl and aluminum siding do not rot, but they have their own set of issues that need attention before painting. Cracks, holes, dents, and panels that are no longer lying flat all need to be fixed. The repair approach is different from wood, so it helps to know what you are working with.
For vinyl siding, small cracks and holes can be filled with a paintable vinyl patching compound. Larger damaged sections usually mean cutting out the panel and snapping in a replacement piece with a zip tool. If panels are warped or buckled, check the fasteners first since loose attachment is often the culprit. Re-seat them before painting, because paint over a warped panel will flex and fail right along the buckle line.
For aluminum, use an exterior-grade metal filler or auto-body filler for dents and holes. Sand the patch smooth and apply a self-etching or bonding primer before the topcoat so the paint has something to grip. Standard primer alone does not bond as reliably to bare aluminum as it does to wood or previously painted surfaces. Vinyl siding painting that skips the bonding primer step almost always shows adhesion failure within the first year.
Surface Preparation and Paint Adhesion Issues
Once your structural repairs are done, surface preparation is what connects all that repair work to the paint system you are about to apply. Rushing this phase is the most common reason paint fails early, even on projects where the repairs were done well.
Proper Cleaning and Mildew Treatment
Every surface needs to be clean and free of biological growth before primer goes on. Mildew and algae are not just cosmetic problems. They create a layer between your siding and the paint film that prevents the paint from sticking properly. Paint over mildew will start peeling within months as the growth continues underneath.
Use power washing to clear loose paint, dirt, and surface debris. For mildew and algae, treat those areas with a diluted bleach solution (roughly one part bleach to three parts water with a small amount of detergent) before or after pressure washing. Let it sit for ten to fifteen minutes, then rinse thoroughly. Give the siding enough time to dry completely before moving on, typically 24 to 48 hours. Painting over damp siding traps moisture and leads to blistering no matter how good the paint is.
After cleaning, scrape any remaining loose or peeling paint with a stiff scraper. Feather the edges of scraped areas with 80 to 100 grit sandpaper so there is no hard ridge where bare wood meets old paint. That ridge will show through your topcoat as a visible line if you do not smooth it out first.
Window and Trim Integration Repairs
Window frames, door frames, and trim boards are where moisture most often finds its way into the wall. Failed caulk around these openings is one of the main reasons you see wood rot and peeling paint during your inspection. Taking care of these spots is a required part of siding prep for painting, not something to skip if you are short on time.
Pull out all the old caulk from window and door perimeters using a caulk removal tool or utility knife. Do not paint over caulk that is cracked, shrunken, or pulling away. Once the old material is out, clean the joint, let it dry, and apply a fresh bead of paintable siliconized acrylic exterior caulk. Smooth it with a wet finger or caulk tool and let it cure fully before priming over it.
On older single-pane windows, check the glazing compound around the glass. Glazing that is cracked or missing lets moisture into the wood sash and frame. Scrape out the failing material, apply fresh glazing compound, let it skin over for the time the manufacturer recommends, and then prime it before painting. Glazing compound that goes unprimed dries out quickly and cracks again soon after.
Trim boards with soft spots, split faces, or a heavy buildup of old paint may need to be replaced rather than just recoated. Fresh trim stock is straightforward to install and gives the new paint system a clean, stable surface to start from.
Repair Sequencing and Material Compatibility
The order you work through repairs matters almost as much as the repairs themselves. Getting out of sequence can mean contaminating surfaces you already cleaned or priming over a patch that has not fully cured. Here is a reliable sequence for siding repair before paint that keeps things moving without backtracking.
- Complete all structural repairs first, including rot removal, board replacement, and fastener corrections.
- Fill all cavities and holes with epoxy or exterior-grade filler and allow full cure time before sanding.
- Sand all patched areas flush and feather any edges where old paint meets bare substrate.
- Treat mildew and algae with the appropriate cleaning solution before pressure washing.
- Pressure wash the entire surface and allow it to dry completely, typically 24 to 48 hours.
- Apply fresh caulk to all window, door, and trim perimeters once the surface is dry.
- Spot-prime bare wood, epoxy patches, and any rust-stained areas before the full primer coat goes on.
- Apply a full coat of exterior primer to all repaired surfaces before topcoat application.
Material compatibility is worth paying attention to here. Epoxy fillers work with both oil-based and latex primer systems, but check the product's data sheet to confirm the recommended primer. Some two-part epoxy products call for a specific primer to get full adhesion. Self-etching primers designed for metal should not go directly over wood without a separating coat. Using the wrong primer over a repair material can produce adhesion failure that looks just like a bad paint job, when the real issue is a mismatch between the patch and the primer.
Quality Assessment Before Priming
Before you open your primer, take one more walk around the house using the same approach you used at the start. You want to be confident the surface is truly ready. If anything on the list below is not done, finish it before moving forward. Primer sealed over an unresolved repair becomes a sealed-in problem that will show up later as a paint failure, often after the topcoat is already on.
- All rotted wood has been removed and replaced or filled with fully cured epoxy filler.
- All fasteners are countersunk, filled, and sanded flush.
- All gaps between siding boards are filled with paintable caulk or appropriate filler.
- All mildew and algae have been treated and rinsed away completely.
- The surface is fully dry with no visible moisture, especially around window frames and at the base of walls.
- All loose or peeling paint has been scraped and edges feathered smooth.
- Fresh caulk has been applied at all window, door, and trim perimeters and has fully cured.
- Bare wood, epoxy patches, and rust-stained spots have received spot primer.
Why Choose Ace Hardware Painting Services Metro Denver
We know that getting your exterior painted can feel like a big undertaking. There are a lot of steps, and it can be hard to know where to start. That is exactly what Ace Hardware Painting Services Metro Denver is here for. Our crew handles full home exterior painting from the initial inspection all the way through the final topcoat, including every repair and surface preparation step covered above. Crew members are background-checked W-2 employees, which means you get consistent, accountable workmanship on every visit. We work to Benjamin Moore paint standards and back exterior projects with a workmanship guarantee. Homes throughout the Lakewood, CO area come in all kinds of siding types and conditions, and our team is trained to spot exactly what each surface needs before a brush ever touches the wall. When you are ready to take the next step, Get an Estimate from Ace Hardware Painting Services Metro Denver.
FAQ
How long should epoxy filler cure before I prime over it?
Most two-part epoxy wood fillers are sandable within one to four hours at around 70 degrees Fahrenheit, but a full 24 hours of cure time is typically recommended before priming. Check the instructions for the specific product you are using. Priming too early can trap solvents and cause adhesion problems right at the patch.
Can I paint vinyl siding without doing any repairs first?
If the panels are flat, structurally sound, and free of cracks or holes, you can move straight to cleaning and a bonding primer application. Any cracked panels, loose sections, or warped areas need to be fixed before you paint, though. Paint will not stabilize a damaged panel and will fail along any flex or crack line over time.
Do I need to remove all peeling paint before repainting exterior siding?
Yes, all loose and peeling paint needs to come off before the new paint system goes on. Paint bonds to whatever is directly beneath it, so if that surface is a failing layer of old paint, the new coat will peel right along with it. Scrape down to a firm surface, feather the edges smooth, spot-prime bare areas, and then apply your primer coat over the full surface.
What type of caulk should I use around windows and door frames on siding?
A paintable, siliconized acrylic latex caulk is the standard choice for exterior window and door perimeters on wood or composite siding. It stays flexible through temperature changes, takes paint without fish-eyeing, and bonds well to both wood and vinyl trim. Avoid pure silicone caulk in these spots because it cannot be painted over and will show as a glossy, unfinished line through your topcoat.
How do I know if a rotted board needs to be replaced or can be repaired with filler?
A good rule of thumb is that rot affecting less than half the board's thickness in a localized area can be stabilized and filled with epoxy products. If the rot goes through more than half the thickness, runs more than twelve to eighteen inches along the board, or has compromised where the board attaches to the wall, replacement is the better path. When you are not sure, replacement gives you a more reliable surface for the new paint than a large filler patch would.