Does Old Paint Need to Be Removed Before Repainting?
Does old paint need to be removed before repainting? The honest answer is: it depends on what the existing paint is doing. In many cases, painting right over the old coat works perfectly well. In others, skipping removal means the new finish will start peeling within a season, and you will end up doing the whole job twice. Homeowners in Lenexa, KS run into this question on everything from bedroom walls to exterior siding, and the right call comes down to a simple inspection of what is already on the surface.
Signs Your Old Paint Must Be Removed
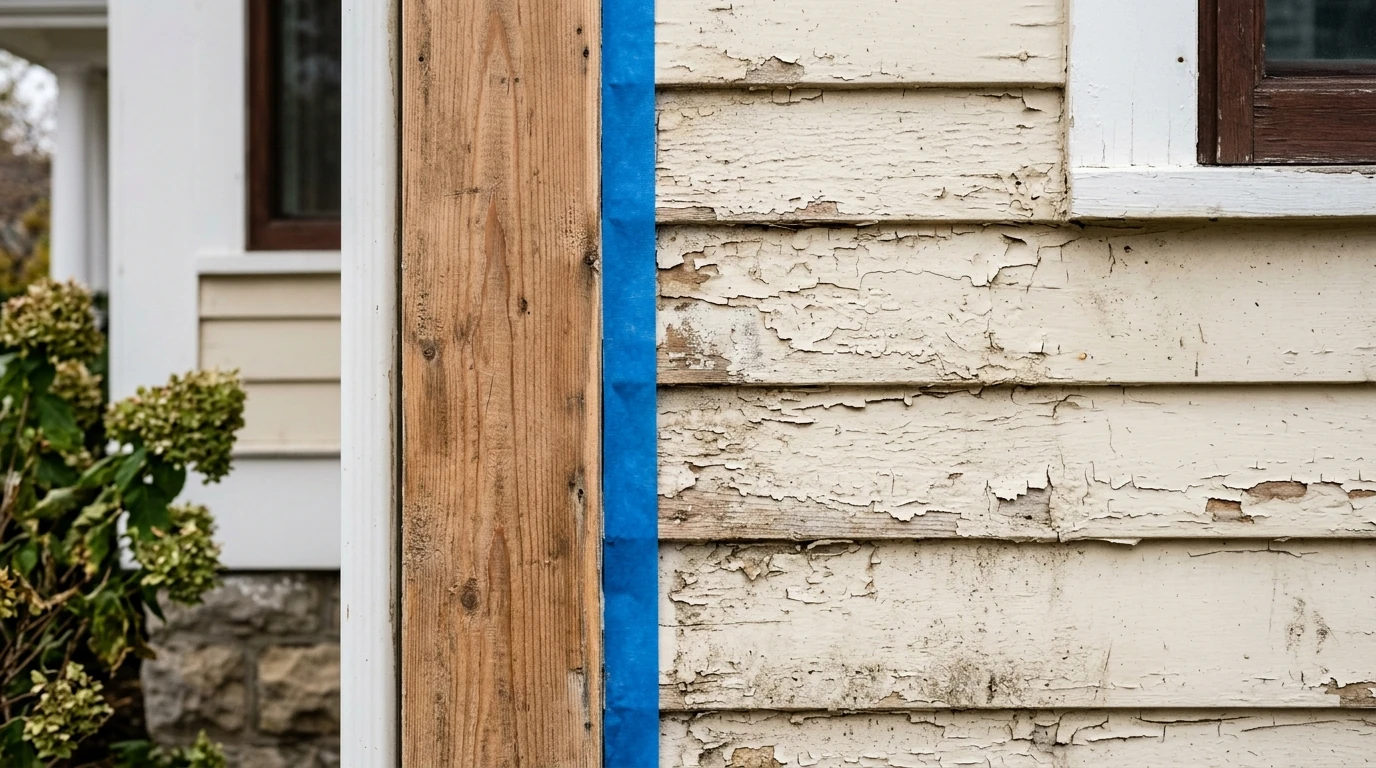
The clearest reason to strip old paint is when it has already stopped holding on. If the existing coat is not bonded to the surface, a new layer on top inherits that same problem. The new paint peels right along with the old, and the surface ends up in worse shape than when you started.
Walk the surface and look for these warning signs before you decide anything:
- Peeling or flaking paint that lifts away when you press or lightly scrape it.
- Bubbling or blistering across a wide area, which usually means moisture is trapped beneath the film.
- Deep cracks that run through multiple layers all the way down to bare surface.
- Heavy chalking where rubbing a hand across the surface leaves a thick powdery residue on your palm.
- Paint build-up so thick that windows or doors no longer close cleanly along their edges.
- Mildew or biological growth that has worked its way into the paint film itself.
If you are not sure whether the existing coat is still bonded, try a quick tape test. Press a strip of painter's tape firmly onto the surface and pull it back sharply at a 45-degree angle. If paint transfers to the tape in more than a few scattered flecks, the bond has failed and removal is the right call.
When Paint Removal Is Optional vs Required
Plenty of repainting projects do not require stripping back to bare surface at all. If the existing coat is solid, well-attached, and free of the failure signs above, painting over it is a perfectly standard approach. Here is a simple way to think through the decision:
- Paint is intact, firmly bonded, no peeling or bubbling: removal is optional. Clean it, sand it lightly, and apply the new coat.
- Exterior paint shows minor surface oxidation: removal is optional. A thorough wash and light sanding gets the surface ready for new paint to grip.
- Existing finish is glossy but not failing: removal is optional, but scuff-sanding is required so the new coat has something to hold onto.
- Active peeling, widespread cracking, or a failed tape test: removal is required before any new paint goes on.
- Four to six or more layers built up on a wood surface: removal is strongly recommended before adding more.
- Pre-1978 home and the surface is being disturbed: lead testing should happen before any mechanical removal begins.
Painting over old paint that is still doing its job is a completely accepted practice on both interior and exterior surfaces. The key is that the existing film has to give the new coat a sound base to work from. Even when you are not stripping, cleaning and scuff-sanding are still part of good surface preparation.
Safety Protocols for Removing Old Paint
If your home was built before 1978, lead paint is a real possibility and it changes how removal needs to be handled. The EPA's Renovation, Repair, and Painting Rule requires that firms doing work that disturbs lead-based paint use certified renovators and follow specific containment practices. Before any mechanical removal starts on an older surface, a lead test kit or a certified inspector can tell you what you are working with.
When lead paint is present, these steps protect everyone in the home:
- Seal off the work area with plastic sheeting so dust cannot drift to other rooms or outside.
- Wear a properly fitted N-100 respirator rated for lead dust, not a standard paper dust mask.
- Use wet-sanding methods or HEPA-equipped power tools to keep airborne dust to a minimum.
- Bag and label all debris, paint chips, and plastic sheeting as lead-containing waste before it leaves the work area.
- Clean the space with a HEPA vacuum followed by wet mopping before removing the containment barrier.
Crews handling residential exterior repainting on older homes carry EPA RRP certification and follow lead-safe work practices on every project as a matter of standard procedure. If you are unsure whether lead paint is present in your home, getting a professional assessment before starting any removal work is the safe and practical move.
Paint Removal Methods: What Works Where
Three main approaches cover most residential paint removal situations. Picking the right one for your surface and paint condition saves time and protects the material underneath.
Thermal Removal for Multi-Layer Paint
Heat guns and infrared paint removers warm the existing film until it softens, so a scraper can lift multiple layers cleanly without a lot of force. This approach works well on thick paint build-up on wood siding, trim, and millwork. Because the paint releases softly, you are less likely to gouge the wood underneath, which matters especially on detailed trim profiles and door casings.
Infrared removers run at lower surface temperatures than heat guns, which reduces the chance of scorching the wood. Both tools need careful handling near glass, caulk lines, and anything combustible. One important note: thermal removal is not the right choice when lead paint is confirmed, because high temperatures can release lead compounds into the air.
Chemical Stripping: When and How to Use
Chemical strippers work by dissolving the bond between the paint and the surface beneath it. They are a good choice on carved millwork, railings, and detailed trim where a scraper cannot get into every contour. Gel formulations cling to vertical surfaces and give the stripper time to work without running off.
Apply a thick, even layer and cover it with plastic sheeting to keep it from drying out before the chemical action is done. After scraping the softened material away, a neutralizing wash compatible with the product you used gets the surface ready for priming. Wear chemical-resistant gloves and eye protection throughout the process.
Mechanical Removal: Sanding and Scraping
Sanding and scraping are the go-to approach for most residential projects. A carbide scraper handles loose and flaking paint efficiently on flat exterior surfaces. Follow up with a random-orbit sander or detail sander using 60- to 80-grit abrasive to feather the edges where stripped areas meet intact paint. That feathering step makes a real difference in how smooth the finished surface looks.
Mechanical removal kicks up fine particles, so wear a dust mask rated for fine particulate and eye protection. On surfaces where lead paint may be present, HEPA-equipped tools and proper containment are required. Even on surfaces that do not need full stripping, a light mechanical scuff improves how well the new coat sticks.
Surface Preparation After Paint Removal
Once the old paint is off, bare substrate needs attention before any primer or finish coat goes on. For wood surfaces, check for soft spots or raised grain from moisture exposure during stripping, then sand smooth with 100- to 120-grit paper. Bare wood absorbs moisture quickly in outdoor conditions, so try to prime as soon as the surface is ready rather than leaving it exposed.
Primer choice depends on what is underneath. Bare exterior wood does well with an alkyd or oil-based primer that penetrates the grain and seals tannins. Bare drywall after interior removal needs a PVA primer to even out the porosity and prevent the finish coat from looking uneven. Bare metal needs a rust-inhibiting primer applied before any oxidation can get started.
The edges where bare substrate meets intact surrounding paint deserve attention too. Sanding those transitions smooth prevents a visible ridge showing through the new topcoat. Spot-prime the bare areas before priming the whole surface so the finish coat absorbs evenly. Homeowners adding exterior power washing to their prep work should let the surface dry fully, usually 24 to 48 hours, before priming.
Disposing of Removed Paint the Right Way
Paint chips, scraped debris, and chemical stripper waste from a removal project cannot go straight into the regular trash in most places. In the Kansas City Metro area, how you handle paint waste depends on whether it contains lead and whether it is latex or oil-based.
Latex paint without lead can usually be dried out completely and set out with regular solid waste. Leave the lid off the can or mix the paint with an absorbent material to speed drying. Oil-based paint and chemical stripper waste are classified as hazardous materials and need to go to a designated household hazardous waste facility. Johnson County and the surrounding metro counties offer regular drop-off events and permanent collection sites for exactly this purpose.
Lead-containing debris must be treated as hazardous waste no matter how small the amount. EPA guidelines call for double-bagging it in heavy-duty plastic, sealing it securely, and taking it to a facility equipped to handle it. If you are unsure about the rules for your specific situation, your local solid waste authority can give you straightforward guidance before you dispose of anything. For projects generating a significant volume of lead-containing waste, working with a certified professional keeps all of that compliance off your plate.
Remove vs Paint Over: Weighing the Options
Painting over old paint that is still in good shape is a legitimate, practical choice. It cuts down on labor and materials, and when surface preparation is done right, the finish holds up just as well as one applied over bare substrate on a sound surface.
That changes when the existing paint is failing. A new coat applied over peeling or poorly bonded paint will peel right along with it. You end up redoing the entire job within a season or two, paying for the labor twice and still doing the removal that should have happened first. Taking the time to strip at the start is almost always less work and less expense than fixing a failed finish later.
Full removal resets the surface to a clean, known starting point. On exterior surfaces that take the full force of weather and sun, that starting point translates to a longer-lasting finish. On interior surfaces in high-traffic rooms or anywhere moisture is a factor, the added durability is worth it too. And on wood windows and doors with heavy paint build-up, removal restores proper clearances that help prevent moisture from getting trapped at the frame joints.
When you are planning a full home interior painting project, a careful surface condition walk-through at the start makes the remove-vs-paint-over decision straightforward rather than a guess.
Why Choose Westlake Ace Hardware Painting Services Kansas City Metro
A paint project can feel like a lot to figure out on your own, and that is exactly where Westlake Ace Hardware Painting Services Kansas City Metro comes in. We bring the same helpful, knowledgeable approach that homeowners in Lenexa, KS have come to expect from Ace Hardware into the home painting experience. Every residential project is completed using Benjamin Moore paints and stains, which means you are getting a finish built for real durability. Color consultation and physical color samples are included so you feel confident in your choice before a single drop of paint goes on the wall. Our workmanship guarantee means if something is not right, we make it right. Our crews are background-checked W-2 employees, so the same trained, accountable people see your project from surface prep through final coat. Whether your project needs full paint removal or a thorough prep and repaint, we assess the surface honestly and do the work correctly from the start. Get an Estimate from Westlake Ace Hardware Painting Services Kansas City Metro and let us put together a plan based on the actual condition of your home.
FAQ
Can you paint over old paint without any surface preparation?
It is not a good idea. Even when the existing coat looks fine, the surface still needs to be cleaned to remove dirt, grease, and chalk, and lightly sanded so the new coat has something to grip. Skipping that step shortens how long the finish lasts, regardless of how good the paint itself is.
How many layers of paint is too many before you need to strip?
Four to six cumulative layers is generally where build-up starts causing problems, especially on wood surfaces. At that thickness, the film can crack more easily, moisture gets trapped at the substrate, and windows or doors may stop operating cleanly. On flat walls the threshold is a bit more forgiving, but if you see cracking or peeling at heavily built-up areas, that is a reliable sign that removal is the better path.
What is the fastest way to remove old paint from exterior siding?
For large flat surfaces with significant build-up, an infrared paint remover paired with a carbide scraper is usually the most efficient combination. The infrared tool softens a broad area quickly and the scraper lifts multiple layers in a single pass without damaging the wood beneath. For detailed trim profiles where a scraper cannot reach cleanly, a gel chemical stripper does the job well. Using both approaches together, infrared on the flat field areas and stripper on the trim, typically gets an exterior project done in the least amount of time.
Do you need to prime after removing old paint?
Yes, always. Bare substrate after paint removal needs a compatible primer before the finish coat goes on. Primer seals the surface, evens out porosity, and gives the topcoat a solid foundation to bond to. The right primer depends on the material: alkyd or oil-based for bare exterior wood, PVA for bare drywall, and rust-inhibiting primer for bare metal. Skipping it leads to uneven absorption and a finish that does not hold as long as it should.
What is the hardest color to paint over without full removal?
Deep, saturated darks are the toughest to cover, particularly rich reds and deep blues. Those pigments require more topcoat to reach full opacity because of the way they absorb and scatter light. A high-hide primer applied over the dark existing color before the finish coat reduces the number of coats you need and gives you a more even result. Good surface preparation and the right primer make covering a dark color with a lighter one much more manageable.