
Do I Need to Prime Before Painting?
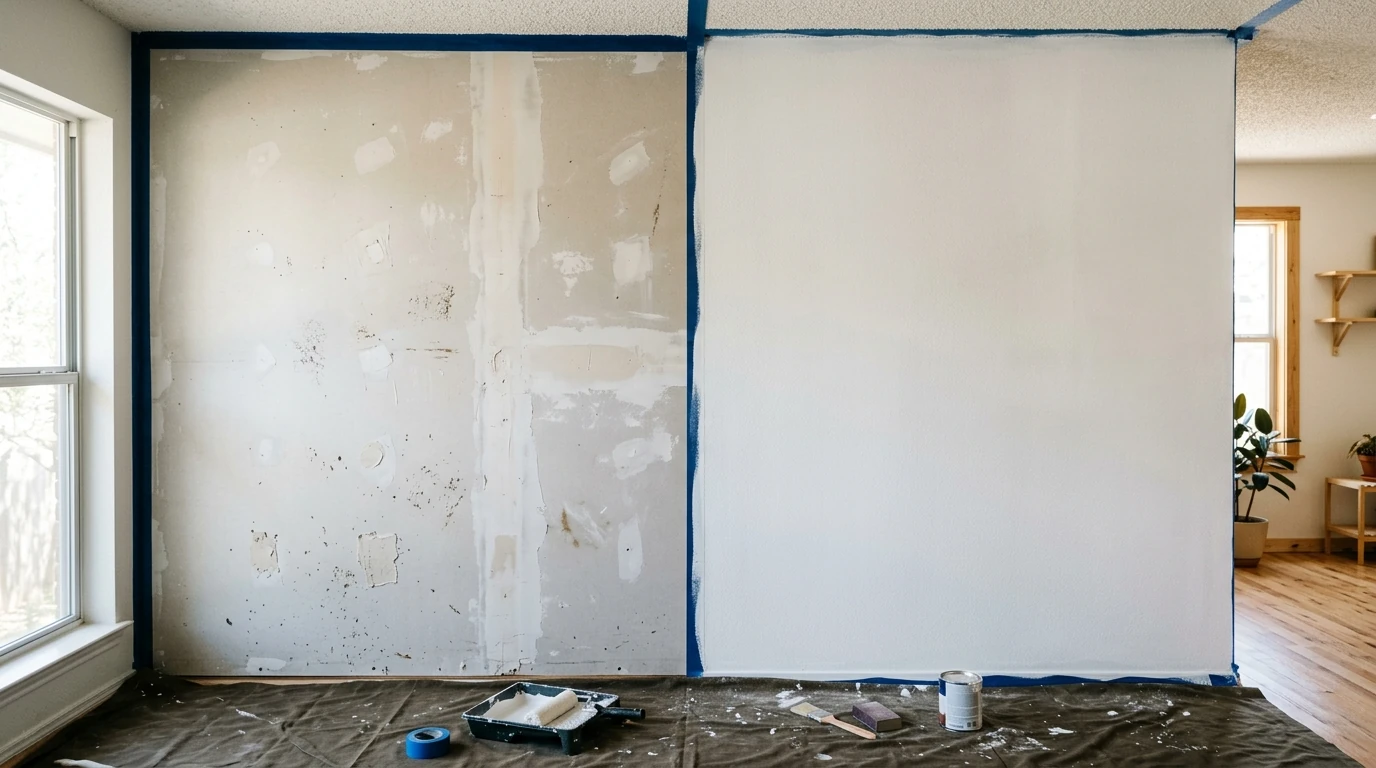
So, do you need to prime before painting? The honest answer is: it depends on what you are painting. In Austin, TX, homes run the full range from freshly drywalled new builds to older wood-framed houses with layers of paint built up over decades. On a clean, well-painted interior wall in solid shape, you can often skip the primer and go straight to your topcoat. But on bare drywall, raw wood, or a surface with stains or a glossy finish, skipping primer is a shortcut that almost always shows up in the finished work. Knowing which situation you are in makes the whole project go smoother and last longer.
When You Can Skip Paint Primer Safely
Primer is not a required step on every paint job. If your surface is already in good shape, you may be able to go straight to your finish coat and get a great result. Here is what that looks like in practice.
You can generally skip primer when all of the following are true:
- The surface has a clean, intact coat of latex paint with no peeling, flaking, or cracking.
- The existing paint and your new paint are the same base type, latex over latex.
- The color change is relatively minor, shifting between similar mid-tones rather than going dark to very light.
- The surface shows no staining, moisture damage, or heavy discoloration.
- If the existing sheen is semi-gloss or higher, the wall has been lightly cleaned and scuffed.
Paint-and-primer-in-one products, sometimes called self-priming paints, work well in these conditions. They are a practical time-saver when your surface already meets the checklist above. They are not a stand-in for a real primer coat on new drywall, bare wood, or any surface with a real problem to seal. If the surface passes, great. If it does not, a separate primer coat is the right foundation and will save you headaches later.
Surface Types That Always Require Paint Primer
Some surfaces just do not play well with paint applied directly. No matter how good your topcoat is, it cannot compensate for a substrate that needed primer first. If your project touches any of the following, primer is part of the plan.
New Drywall and Plaster Surfaces
New drywall is incredibly thirsty. The paper face and the joint compound at the seams absorb paint at completely different rates. When you skip primer and paint directly, you end up with a blotchy, uneven look called flashing, where some spots look flat and dull while others look normal. You can see it even under a second topcoat if the primer step was skipped. A drywall primer, sometimes called a PVA primer, seals the whole surface evenly so your topcoat goes on with consistent coverage and sheen. Paint manufacturers flag new drywall as a required-prime surface across the board, and it is easy to see why when you compare the results.
Bare Wood and Previously Stained Surfaces
Raw wood has two things working against you. First, many wood species contain tannins that bleed through water-based paint, showing up as yellow or brown stains that push through coat after coat. Second, bare wood is porous enough that latex paint applied directly will not bond evenly and is far more likely to peel at edges and end grain over time. An oil-based primer or a shellac-based stain-blocking primer handles both problems at once. It locks the tannins in place and gives the topcoat something solid to grip. If you are working on raw trim, bare exterior wood, or a surface that held a dark stain, start with the right primer and you will not have to wonder why the color looks off six months later.
Glossy and Previously Painted Surfaces
Gloss repels adhesion. If you brush a fresh coat over a high-gloss finish without doing anything to that surface first, the new paint has very little to hold onto and is much more likely to chip or peel within months. A bonding primer creates the mechanical grip that gloss takes away. On trim, doors, and cabinets that get regular contact and wear, a bonding primer is the reliable route. Thorough sanding can reduce the sheen enough in some cases, but a bonding primer handles surfaces with heavy build-up, unknown paint history, or uneven texture more consistently than sanding alone.
For homes throughout the Austin area where trim or cabinets are getting a refresh, proper surface preparation paired with interior trim painting is what separates a finish that holds up for years from one that starts chipping within months.
Understanding Different Paint Primer Types
Picking the right primer type matters as much as deciding to prime in the first place. Using the wrong primer for your surface can still leave you with adhesion problems or a topcoat that does not behave the way you expected. Here is a plain-English breakdown of what is out there and when to reach for each one.
- Latex primer: Water-based, low odor, quick to dry. A good all-purpose choice for most previously painted interior walls and ceilings. Not the right pick for tannin-heavy woods or severe stains.
- Oil-based primer: Better stain blocking and stronger adhesion on bare wood, metal, and chalky or peeling surfaces. Takes longer to dry and requires mineral spirits for cleanup, but it earns its place on tougher surfaces.
- Shellac-based primer: The heaviest-duty stain blocker in the lineup. Handles smoke damage, water stains, tannin bleed, and marker stains that other primers struggle with. Dries fast but needs denatured alcohol to clean up.
- Bonding primer: Made specifically for slick or glossy surfaces where standard primers simply will not grip. Use on high-gloss trim, laminate, tile, or glass surfaces.
- Drywall primer (PVA primer): Designed for new drywall and plaster. Seals the porous surface evenly to prevent flashing. It is purpose-built for this job and not a swap-in for other primer types.
As a general rule, match your primer chemistry to your topcoat chemistry. Latex primer under latex paint, oil-based primer under oil-based paint. If you use an oil-based or shellac primer under a latex topcoat, give the primer its full cure time before applying the finish coat, usually at least 24 hours, and longer if your space is humid or on the cooler side.
What Happens When You Skip Primer
Skipping primer on a surface that needs it does not always blow up immediately. Sometimes the problem shows up weeks or months later, which can make it easy to forget what the root cause was. Here are the most common things that go wrong.
- Peeling and flaking within six to twelve months, especially on bare wood or glossy surfaces where the paint never had solid adhesion to begin with.
- Flashing on new drywall, where the topcoat absorbs differently across the paper face and joint compound and creates an uneven, patchy sheen.
- Tannin bleed-through on wood, showing up as yellow or brown discoloration that keeps coming back through multiple topcoats.
- Poor hide requiring three or four coats to get coverage that two coats over primer would have handled easily.
- Stain or smoke bleed-through on damaged surfaces, where the underlying issue reappears through the new paint over time.
The real cost is the rework. When primer would have added one coat and a few hours, fixing a failed finish means stripping, re-prepping, priming, and repainting all over again. That multiplies the time and materials several times over. A little patience upfront is a much better deal.
Primer Application Tips That Make a Difference
Choosing the right primer gets you most of the way there, but applying it well matters too. A thin, uneven primer coat still leaves vulnerable spots. Most water-based primers cover roughly 300 to 400 square feet per gallon on a smooth surface. Porous surfaces like new drywall or raw wood absorb more, so plan for a heavier application or a second primer coat in high-absorption areas.
Dry time varies by type and conditions. Most latex primers are dry to the touch in about an hour but do better with two to four hours before you apply your topcoat. Oil-based primers need at least eight hours, often a full day. In Austin, TX, summer humidity can slow water-based primer dry times noticeably, so check the product label for humidity guidelines before scheduling your next coat.
Temperature plays a role too. Most primers should go on between 50 and 90 degrees Fahrenheit. For exterior work, no rain in the forecast for at least 24 hours after application gives the coating time to cure properly. Two thin coats nearly always beat one heavy coat on problem surfaces. Going on too thick leads to uneven texture and longer dry times than you want.
On exterior projects, proper power washing and surface prep before priming ensures you are bonding to a clean, sound surface rather than to loose dirt or chalk that will pull away later.
Troubleshooting Common Primer Problems
Even with the right primer in hand, things can go sideways during application. Catching problems early means you can fix them before the topcoat goes on.
Streaks and lap marks in the primer usually happen when you are working in sections that are too large and letting edges dry before blending them together. Work in manageable sections and keep a wet edge as you go. On larger walls, a roller with a three-eighths inch nap applies primer more evenly than a brush and cuts down on lap marks.
Poor coverage after one coat on new drywall or bare wood is normal on highly porous surfaces. A second primer coat after full dry time builds the seal your topcoat needs. Piling on extra finish coats to compensate typically leads to continued coverage inconsistency rather than fixing the actual problem.
Wrinkling or lifting of the topcoat is usually a compatibility timing issue. This happens most often when a latex topcoat goes over an oil-based primer that has not fully cured. Giving the primer its full recommended cure time takes care of most compatibility problems. If you are not sure what type of primer is already on a surface, a light sand and a fresh primer coat in the right type is more reliable than guessing.
Pinholes or bubbles in the primer surface usually mean the substrate is off-gassing, often on a porous surface or when primer is applied in direct sun or high heat. Apply primer in shade on exterior surfaces when you can, and let it rest before adding your topcoat.
Making the Right Primer Decision for Your Project
If you are standing in front of a surface and not sure what to do, run through these four questions. They point you toward the right call on almost any project.
First, is the surface bare or does it already have paint? Bare drywall, raw wood, and bare masonry nearly always need primer. Existing paint in good condition is a different story.
Second, what is the condition of the existing surface? Is the paint peeling, stained, chalky, or glossy? Any of those conditions calls for primer, and the condition tells you which type to reach for.
Third, how dramatic is the color change? Going from a deep, saturated color to a light neutral without primer means many more topcoats and you may still see the original color showing through. A tinted primer close to your finish color improves hide and cuts down the number of coats you need.
Fourth, what kind of environment is this surface in? Bathrooms, kitchens, and exterior surfaces deal with more moisture and wear. The right primer for those conditions gives your finish coat a much better chance of lasting.
When the answers point toward primer, use it. The dry time is a small trade for the durability you get. When the surface genuinely meets the skip-it criteria, skipping primer is a legitimate time-saver, not a gamble. The goal is just knowing the difference before you start.
Why Choose Ace Hardware Painting Services North Austin
At Ace Hardware Painting Services North Austin, we know that a paint project can feel overwhelming before it even gets started. You have questions about prep, primer, color, and how long the whole thing will take. We make that easier. Every project starts with a real look at what your surfaces need, and primer decisions are made based on the actual condition of the substrate, not skipped to move faster. We use Benjamin Moore paints and primers as our standard, products that hold up well on the wide range of surfaces found in homes throughout Austin, TX. Residential projects include color consultation and physical samples so you can see your selections in your own space before anything gets painted. Our crews are background-checked W-2 employees and our work is backed by a workmanship guarantee, so you know what you are getting from the first coat to the last. When you are ready to take the next step, Get an Estimate from Ace Hardware Painting Services North Austin.
FAQ
Can I use paint and primer in one instead of a separate primer coat?
Paint-and-primer-in-one products work well when your surface already has a clean, intact coat of paint in solid condition. They are not a reliable substitute for a dedicated primer on new drywall, bare wood, heavily stained surfaces, or glossy finishes. If the surface genuinely needs a primer, a separate coat will give you a more durable and consistent result than a self-priming paint can on its own.
How long should I wait after applying primer before painting over it?
Most latex primers are ready for a topcoat in two to four hours under normal conditions. Oil-based primers typically need at least eight hours and often do better with a full 24-hour cure before you paint over them. Always check the label for the manufacturer's recommended recoat window, and give it extra time if the humidity is high or temperatures are pushing above 85 degrees Fahrenheit.
Do I need a special primer for new drywall?
Yes. New drywall needs a drywall primer, often called a PVA primer, which is made specifically to seal the porous paper face and joint compound at a consistent rate. Standard latex primers do not seal new drywall as evenly and are more likely to leave you with flashing, where sections of the wall absorb paint differently and create an uneven sheen under your topcoat.
What primer works strongest on a glossy painted surface?
A bonding primer is your strongest option for glossy painted surfaces. It is engineered to grip slick, non-porous surfaces where standard primers do not have enough traction to hold. Scuffing the surface lightly before applying the bonding primer improves adhesion even further, which is especially worth doing on trim, doors, and cabinets that take regular wear.
Is primer necessary for exterior painting projects?
On exterior work, primer is needed on any bare wood, exposed masonry, previously stained surfaces, or areas where the existing paint has failed. Sound, clean exterior paint in good condition may not need a full primer coat, but spot-priming any bare areas exposed by scraping or sanding is always the right move before topcoat goes on. Skipping spot primer on bare exterior wood is one of the most common reasons exterior paint fails ahead of schedule.